Pattern Matching
Our experience in the manufacturing of patterned material has shown that two closely related factors affect pattern matching. We package, ship and display our products in roll form; but the composition of the materials may result in stretching of the wear layer and the patterns on it. This is caused by bending the material in the process of making rolls. Stress or stretching during roll-up will vary, depending on how tightly the material was rolled and the location of the individual laps within each roll. The bending stress is four times greater on the lap around a 3″ core and two times greater on the lap around a 7″ core than it is on the outer lap of a roll that is 12″ in diameter.
Some products will experience more bending stress than others. The amount and type of wear layer, thickness of the backing and similar basic construction elements all affect the nature and degree of recovery from bending stresses that each product exhibits when unrolled and flattened out. Regardless of product type, there are several general rules installers should observe when dealing with any patterned material to minimize pattern matching problems.
- Cut materials from the roll on the day before the material is to be installed. This is important to the conditioning process and takes no longer than cutting it the day of the job. It may take a little reorganizing of the installer’s time.
- Mark the pieces 1, 2, 3 and so on as they are cut from the roll. This marking will keep the pieces in the right sequence and will allow the proper piece to be installed first. Place a piece of masking tape on the same side of each piece as they are cut. This piece of masking tape will identify one side as the trademark side.
- Pre-match the pieces in the shop if at all possible. Lay the pieces out in the order they will be installed and check if there is any pattern runoff. If there is not an acceptable match, turn the pieces around and check the match that way. If you start with the trademarked edge of piece #1 to the nontrademarked edge of piece #2 and the match is not acceptable, turn the pieces so the nontrademarked edge of piece #1 is matched to the trademarked edge of piece #2. It does not matter how the first piece is installed in the room, and if one way will provide a better match than the other, start that way. Of course, you have this option only before the first piece of material is installed. After the first piece is bonded in place, it is too late to try this procedure.
- Roll all pieces face out into separate rolls having the same diameter. This begins the conditioning process. If all pieces are rolled to the same size, then bending stress will be uniform and there will be less variation and runoff from piece to piece.
- Install the pieces in the order in which they were cut from the roll (piece 1, 2, 3, etc.). Install the pieces from the outside of the roll first. If there is a runoff of the pattern, the second piece would be longer than the first piece. If this occurs, you can compress the second piece by rolling it face in for a short time to shrink the material. If the pieces are installed in reverse order and the second piece is running shorter than the first, there is no way to stretch the material. Rolling felt-backed materials face in may cause some seam edge curl.
By installing the materials in the room with the shortest possible seams, you lessen the chance of pattern runoff. Most patterned material is recommended for residential installations where seams are not as long as those in commercial installations.
If you are using more than one roll on an installation, install the first pieces from both rolls, then the second pieces and so on.
Cutting patterned materials to exact measured pattern match without regard for the actual stretched match can result in pieces cut too short for matching. Always make job-length cuts on the basis of the length of actual matches in the material being installed rather than on the basis of factory-designated match lengths, such as 18″ and 36″. For instance, on a pattern with a factory-designated match of 18″, the actual stretch match may be 18 1/6″. In a 12′ length, this could accumulate to a total of 1/2′ difference between the measured factory-designated match and the actual stretched matches. Factory-designated matches do not allow for stretching.
To review:
- Cut material the day before the job.
- Mark pieces 1, 2, 3, etc. as they are cut from the roll.
- Prematch in the shop. If match is off, turn all pieces around.
- Roll all pieces face out into separate rolls having the same diameter.
- Install pieces in the order they are cut from the roll (1, 2, 3, etc.). Install pieces from the outside of the roll first.
These steps will practically eliminate mismatch problems. Probably the most critical point is that the pieces be installed in the order they are cut from the roll. Installing pieces out of sequence may cause a pattern match problem.
Pattern Match Indicators
Pattern match indicators are printed in the selvage edge of select sheet flooring patterns.
Certain non-geometric patterns without grout lines (Fig. 1) will have pattern match repeat indicators printed in the selvage edge. This will help workroom personnel and installers quickly locate the pattern repeat, cut sheet flooring accurately to take to jobs, line up the pattern at seams and locate the proper place to cut the seam. Non-geometric patterns without grout lines can make it difficult to determine what length to cut pieces to take to the job site; and on the job site often make it difficult for the installer to correctly align the pattern at a seam. The pattern match indicators take the guesswork out of these steps, save time in the installation process, and allow for the best possible pattern match at the seams.
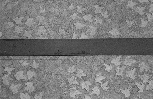
The indicators appear as small bars (1/4″ wide and approximately 1/2″ in length) and occur along both factory edges of 12′ wide material. The bars are printed with the darkest ink used in each of the pattern colorations and appear as flat embossed marks that can help to locate the indicator in overall dark patterns (Fig. 2).

How to use the pattern match indicators when matching and cutting seams.
The pattern match indicators do not change the standard good practices that should be followed when installing multiple pieces of flooring, such as rolling each piece individually on the same size core to take to the job site, installing pieces #1, #2, #3 consecutively as they came off the customer roll, etc. Most residential sheet patterns are designed to be installed trademark edge to non-trademark edge (do not reverse pieces).
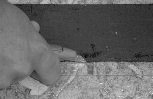
The pattern match indicator will be cut off along with the rest of the selvage edge when the seam is cut properly (Fig. 3).

The exact location for cutting the seam is 1/8″ into the pattern from the end of the indicator bar. This means that, when double cutting a seam, you will overlap the trademarked edge of piece #2 on top of the non-trademarked edge of piece #1 so that:
a. The match indicators are aligned across the seam.
b. The inside end of the top indicator on piece #2 overlaps the inside end of the bottom indicator on piece #1 by 1/4″.
The indicator bars are 1/4″ wide. This will provide a visual reference for judging when you have the correct amount of overlap of the two pieces. You will also be able to quickly reference the other design elements at this point to ensure correct overlap. If there is some minor runoff in the machine direction, balance it in the center of the seam or in the most inconspicuous location.
Position a straightedge 1/8″ away from the end of the indicators on the top piece and cut your seam (Fig. 4). If positioned properly, this seam cut will also be 1/8″ away from the end of the indicator on the bottom piece. Both top and bottom seam match indicators will be removed along with an additional 1/8″ of pattern along both sides of the seam.
For those installers who straightedge and butt seams, the straightedge should be positioned so that the cut is made 1/8″ away from the end of the pattern match indicator on both sides of the seam. This will assure proper match at the seam (Fig. 5). Please keep in mind that the pattern match indicators need to be removed by the installer during the installation and seaming process. If a factory edge of the sheet is butted along a straight wall to start the job, be sure that wall base or moldings will cover the indicators so they are not visible in the finished installation. Armstrong Flooring plans to extend this installation aid to new patterns as appropriate.