
Engineered Tile Installation
For Use With
| Product | Gauge | Size | Adhesive | Comment |
| Alterna | 0.160″ (4.1mm) | 8″ x 16″ (20.3 cm x 40.64 cm) 12″ x 24″ (30.5 cm x 60.9 cm) 16″ x 16″ (40.6 cm x 40.6 cm) | S-295 | For grouted installation use Armstrong S-693 FlexStrong™ Premixed Sanded Acrylic Grout |
Adhesive Summary
| Adhesive | Trowel | Porous and Nonporous |
| S-295 | 1/32″ x 1/16″ x 1/32″ | Dry to touch |
Precaution
| WARNING: EXISTING IN-PLACE RESILIENT FLOOR COVERING AND ASPHALTIC ADHESIVES. DO NOT SAND, DRY SWEEP, DRY SCRAPE, DRILL, SAW, BEAD BLAST, OR MECHANICALLY CHIP OR PULVERIZE EXISTING RESILIENT FLOORING, BACKING, LINING FELT, ASPHALTIC “CUTBACK” ADHESIVE, OR OTHER ADHESIVE. These existing in-place products may contain asbestos fibers and/or crystalline silica. Avoid creating dust. Inhalation of such dust is a cancer and respiratory tract hazard. Smoking by individuals exposed to asbestos fibers greatly increases the risk of serious bodily harm. Unless positively certain that the existing in-place product is a non-asbestos-containing material, you must presume it contains asbestos. Regulations may require that the material be tested to determine asbestos content and may govern removal and disposal of material. See current edition of the Resilient Floor Covering Institute (RFCI) publication Recommended Work Practices for Removal of Resilient Floor Coverings for instructions on removing all resilient floor covering structures or contact your retailer or AHF Products at 866 243 2726. AHF floor coverings and adhesives do NOT contain asbestos. |
Creating Patterns With Engineered Tile
FOR PATTERNED INSTALLATIONS:
- Calculate the square footage of the room
- Add 10% overage to the total
- Reference the pattern guides below to calculate the percentage of each tile size to purchase
Single Tile Patterns
8″ x 16″, 16″ x 16″, or 12″ x 24″
8″ x 16″ or 12″ x 24″
*Requires 1/8″ grout line
16″ x 16″
8″ x 16″ or 12″ x 24″
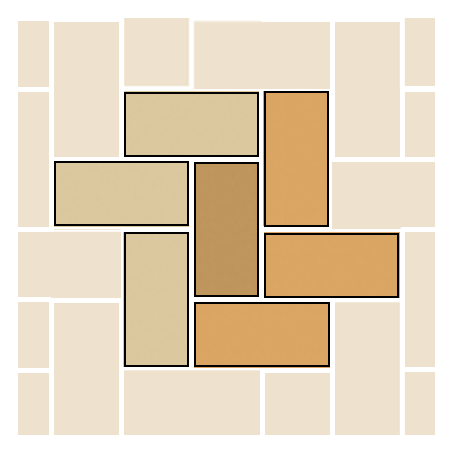
Two-Tile Patterns
8″ x 16″ or 12″ x 24″
SKU #1: 65%
SKU #2: 35%
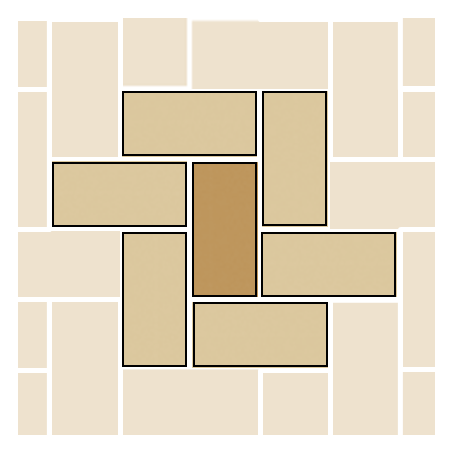
Three-Tile Patterns
8″ x 16″ or 12″ x 24″
SKU #1: 40%
SKU #2: 40%
SKU #3: 20%
**Pattern is random. Recommend performing a dry layout of tiles prior to adhering.
Borders
FOR BORDER INSTALLATIONS:
- Calculate the perimeter of the room in linear feet
- Add 5% overage to the total
Note: Remember that the figure you will get for a border is in linear feet – not square feet.
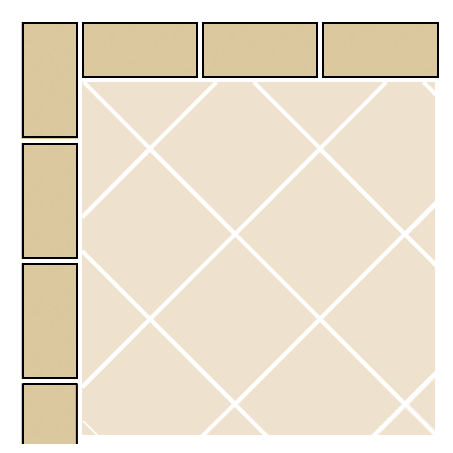
8″ x 16″, 16″ x 16″, or 12″ x 24″
General Information
Engineered Tile can be installed by two installation methods. It can be installed with a standard butt fit as in traditional resilient tile installations; or, Engineered Tile can be spaced and grouted with Armstrong S-693 FlexStrong Grout, Premixed Sanded Acrylic Grout. Both methods require the use of Armstrong S-295 Flooring Adhesive.
For a grouted installation, the tiles should be laid with a grout joint spacing of 1/16˝ (1.6 mm) to 1/4˝ (6.4 mm) utilizing tile spacers designed for this purpose. Because of the rounded edges, the appearance of the finished grout joint will be approximately 1/16˝ (1.6 mm) wider than the actual tile spacing.
Due to Engineered Tile’s large format and increased thickness, extra care is required in handling and storage to keep the product from becoming damaged or distorted. Always store the product on a flat surface. Temperature control and subfloor flatness are important in the prevention of raised or curled edges, and performance of the grouted joints.
Maintain the temperature of the room, subfloor, tile and adhesive at a minimum of 65°F (18°C) and a maximum of 85°F (29°C) for 48 hours prior to installation, during installation, and for 48 hours after installation. Maintain a minimum room temperature of 55°F (13°C) thereafter.
CAUTION: Do not use high temperature heat sources to aid in cutting or making the tile conform to irregularities in the substrate. Multi-layered engineered tile structures can warp or curl after significant heating from sources such as hot plates and heat guns. Condition the room and all flooring materials to the temperature guidelines stated above. If you must warm the tile, always heat from the back and limit the temperature of the tile to warm conditions- less than 110°F (43°C).
When using tile from two or more cartons, check to be sure all pattern and lot numbers are the same to ensure proper color match. On larger installations, open several cartons and mix them as they are installed to help blend any slight shade differences from one carton to the next.
For best appearance, the directional arrows on the back of engineered tile must be randomized when laying the tile (rather than aligned in one direction or in a forced turnblock layout).
Recommended Substrates:
All substrates listed below must be properly prepared and meet the requirements discussed under, Subfloors and Underlayments section. There may be certain exceptions and special conditions for these substrates to be suitable for Engineered Tile Flooring installation. All subfloors must be minimum 1″ thickness.
- Concrete on (all grade levels) according to ASTM F710 and Preparation of Concrete Subfloors
- Suspended Wood and Wood Underlayments
- Most Single-layer, Fully Adhered, Existing Resilient Floors (on approved subfloors and underlayments)
- Ceramic tile, terrazzo, marble and polymeric-poured floors
- Properly mixed and applied powder underlayments and embossing levelers
- Primed, poured-in-placed gypsum subfloors
- Radiant-heated subfloors where the surface temperature does not exceed 85oF (29o C)
Job Site Conditions
- Resilient flooring should only be installed in temperature-controlled environments. It is necessary to maintain a constant temperature before, during and after the installation. Therefore, the permanent or temporary HVAC system must be in operation before the installation of resilient flooring. Portable heaters are not recommended as they may not heat the room and subfloor sufficiently. Kerosene heaters should never be used.
- The surface shall be free of dust, solvents, varnish, paint, wax, oil, grease, sealers, curing compounds, residual adhesive, adhesive removers and other foreign materials that might affect the adhesion of resilient flooring to the substrate or cause a discoloration of the flooring from below. Spray paints, permanent markers and other indelible ink markers must not be used to write on the back of the flooring material or used to mark the substrate as they could bleed through, telegraphing up to the surface and permanently staining the flooring material. If these contaminants are present on the substrate, they must be mechanically removed prior to the installation of the flooring material.
- All substrates must be flat. Variations in flatness must not exceed 1/16˝ (1.6 mm) in 1´ (30.5 cm) or 3/16˝ (4.8 mm) in 10´ (3.05 m). Fill low areas in the substrate with S-194 Patch, Underlayment & Embossing Leveler/S-195 Underlayment Additive or S-466.
- Because of engineered tiles’ size and stiffness, when using the grouted installation method, suspended wood subfloors and underlayments must have a total thickness of 1˝ (2.5 cm) and a minimum 18˝ (45.7 cm) wellventilated air space below. Joist spacing should be on 16˝ (40.6 cm) centers to minimize subfloor deflection.
- In renovation or remodel work, remove any existing adhesive residue* so that no ridges or puddles are evident and what remains is a thin, smooth film.
- Allow all flooring materials and adhesives to condition to the room temperature for a minimum of 48 hours before starting the installation.
- The area to receive the resilient flooring and the flooring materials and adhesives should be maintained at a minimum of 65°F (18°C) and maximum of 85°F (29°C) for 48 hours prior to installation, during installation and for 48 hours after completion. Maintain a minimum temperature of 55°F (13°C) thereafter.
- For concrete substrates, conduct moisture testing (moisture vapor emission rate [MVER]) and/or percent relative humidity (in-situ probe). Bond tests must also be conducted for compatibility with the substrate. Please refer to Chapter 3, Subfloors and Underlayments.
- Radiant heated substrates must not exceed a maximum surface temperature of 85°F (29°C).
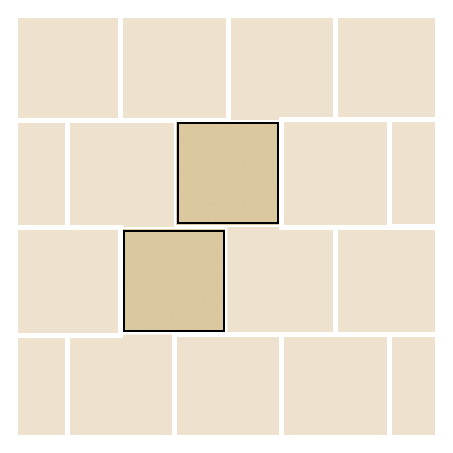
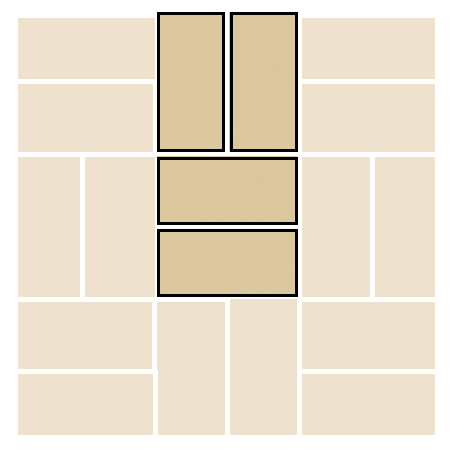
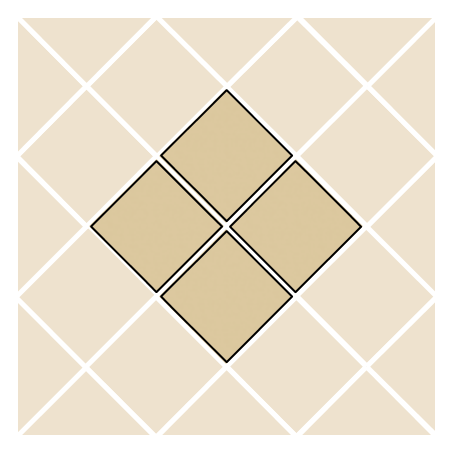
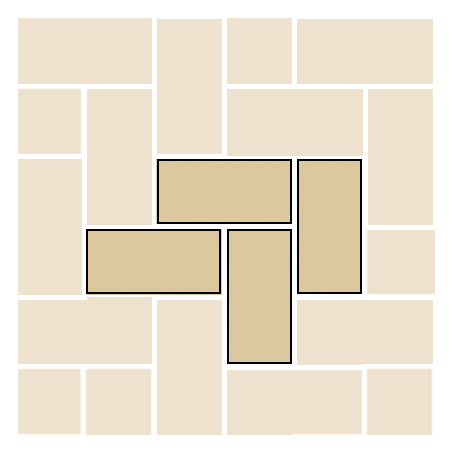
Layout
![]() Mixed size installations or installations with quarter turned 8″ x 16″ or 12″ x 24″ tile must be grouted with 1/8″ grout line
Mixed size installations or installations with quarter turned 8″ x 16″ or 12″ x 24″ tile must be grouted with 1/8″ grout line
Before installing the Engineered Tile Installation System, plan the layout so the tile joints fall at least 6˝ (15.2 cm) away from subfloor/underlayment joints. Do not install over expansion joints. When installing over an existing resilient floor, plan the layout so the new tile joints are a minimum of 6˝ (15.2 cm) away from the original seams. When installing over tile floors, avoid having the tile joints in the same area as the joints in the existing flooring. Taking the most prominent walls in the room into consideration, find the center point in the room. Divide the room into equal quadrants by making two perpendicular lines on the subfloor intersecting at the center point. Starting from the center point, and either by measurements, or by doing a dry layout of the tiles (with proper grout joint spacing), determine the distance between the last full tile and the perimeter walls and cabinets. A balanced layout will result in border tiles being 8˝ (20.3 cm) or greater for the 16˝ x 16˝ (40.6 cm x 40.6 cm) tiles.
If the border pieces are less than 8˝ (20.3 cm) wide, particularly at the prominent walls, you will need to shift the starting point in the middle of the room 1/2 the dimension of the tile [8˝ (20.3 cm) for a 16˝ x 16˝ (40.6 cm x 40.6 cm) tile] to balance the layout. After you have balanced the room to achieve larger pieces at the borders, make two new perpendicular lines on the subfloor intersecting at the new starting point near the center of the room.
Normally you will apply adhesive to 1/4 or 1/2 of the room area at a time so that you can start the installation where the guidelines intersect.
Begin at the starting point and install the tile along the chalk lines, laying the field area first in step fashion. Complete installation of full tile in all quadrants of the room. Do not slide the tile into place. Press tile firmly into the adhesive.
NOTE: Tile spacers do a very good job of maintaining tile alignment; however, the installer must also re-check for proper alignment by using measurements or creating additional lines on the subfloor about every 4´ (every 3 rows of tile) to ensure straight lines and rows of tile. This is very important on larger installations.
Next, cut and fit the border tile at the perimeter. Mechanical tile cutters are available for cutting larger format tile. The score and snap method of using a utility knife to score through the wear surface also works well. Be sure to allow for the grout joint and a 1/8˝ (3.2 mm) gap at perimeter walls when cutting the border pieces.
For irregular cuts, make a pattern out of Kraft paper or cardboard and transfer it to the tile. Score along the markings and snap off small pieces. Ceramic tile nippers or a coping saw are useful in making more intricate cutouts for complicated fittings.
After the engineered tile is installed, remove all tile spacers and immediately roll the entire floor with a 100-lb. roller. Roll the floor diagonally across the tile joints in both directions. Use a hand roller in confined areas where the large floor roller will not reach, such as under toe kicks.
Grouting
See attachment at bottom for illustrated grouting procedures.
- Grouting may be done immediately or the following day.
- Use only Armstrong FlexStrong Premixed Sanded Acrylic Grout. Traditional cement Grouts can NOT be used with Armstrong Premium Tile or Plank Flooring, Engineered Tile and Planks.
- Be sure that all tile edges are firmly seated in the adhesive before starting the grouting process.
- Follow the application instructions as specified on the grout container, working small sections of the floor at a time.
- Use a soft rubber grout float to apply the grout.
- Do NOT spread grout over the entire surface of the tile. Apply the grout and pack it down in the immediate area of the open joints.
- Hold float in almost vertical position and strike off excess grout, pulling the float diagonally across the joints.
- You will need two five gallon buckets and sponge to loosen the grout on the face of the tile or planks. But the preferred method is to have three buckets of water available. Having clean water will reduce the haze on the face of the tile or plank.
- Use one bucket of water to wipe excess grout off the tiles as you install. This prevents the grout from drying to the tile this can be a tile sponge.
- Hold sponge flat and wipe diagonally across the joints
- Do not allow rinse water to accumulate in ungrouted joints, be careful not to wipe grout out of the joints.
- The other bucket is for the final removal of residue and for smoothing the joints. The second sponge should be damp with no excess water. Use a square-edged cellulose sponge that is just damp move the sponge slowly over the surface to pick up the excess water.
- A dry terry cloth towel may be pulled across the surface of the Tile as a final cleaning step.
- If sponges are not sufficient to clean the face of the tile use a white 3M pad with light pressure or a terry cloth towel. It is normal to have a grout haze remaining after the initial clean up. This will be removed in the final clean up once the grouted joints have completely dried.
- Traffic should be kept off the installation until the grout has completely dried minimum of 24 hrs.
- Joints that are wider then 1/16˝ to 1/8˝ may take longer to dry.
- Replace wall base and trim moldings.
Clean-Up Once Grout Dries
- Use one bucket of properly diluted Armstrong Once ’n Done® Resilient & Ceramic Floor Cleaner.
- For small areas use Once ’n Done spray bottle.
- Use 3M pad to remove grout haze that remains.
- Have a second bucket of clear clean water for the final rinse and clean up.
- Buff dry with a soft cloth.
Warning
- Do not wash or scrub the new flooring for at least 5 days after installation.
- Do NOT use solvents or grout haze removers.
- Do NOT use Armstrong New Beginning® Floor Stripper or other floor strippers to clean the grout or maintain Alterna.
- Only use Armstrong Premixed Sanded Acrylic Grout S-693.
- Tile maybe walked on immediately however, NO heavy rolling traffic for an additional 72 hours after installation.
- Use pieces of hardboard or underlayment panels to protect the floor when moving heavy furniture and appliances back into the room.
- Do NOT use mats with latex or rubber backing as they can cause permanent discoloration of your floor.
- Do NOT use vacuums that use a beater bar or turn beater bar off.
- Do NOT use electric brooms with hard plastic bottoms with no padding.
- Do NOT use abrasive scrubbing tools.
- Do not use detergents abrasive, cleaners or “mop and shine” products.
Helpful Maintenance/Care Tips
- Use floor protectors under furniture.
- Wipe up spills immediately.
- Wash your floor regularly with Armstrong Once ’n Done Resilient & Ceramic Floor Cleaner
CAUTION: Engineered Tile Flooring, like other types of smooth floors, may become slippery when wet. Allow time for floor to dry after washing. Immediately wipe up wet areas from spills, foreign substances or wet feet.
Rounding of Cut Edges
NOTE: Engineered tiles have rounded edges formed during the manufacturing process. If a custom installation is designed so that full tiles are cut to smaller sizes and the cut edges are exposed in the field of the installation, it will be necessary to round those cut edges. This technique should only be used in grouted installations.
- After the tile has been cut, a flooring heat gun should be used to focus heat directly at the cut edge (rather than the face of the tile). It is best to have the tile extended over the edge of a work bench by an inch or two so the heat can be direct right on the edge and slightly toward the backing.
- Move the heat gun slowly, back and forth a few times on the edge to be rounded. This edge will become too hot to touch but should not show any scorching.
- Remove heat and slide the tile back on the work bench so that the cut edge is lined up with the edge of the work bench. Immediately roll the edge lengthwise with a steel hand roller, holding the roller at about 45° angle to the horizontal plane. This will slightly round the tile edge so that it simulates the factory edges. There are a variety of heat guns and the installer should practice to find the right settings and technique to achieve the best results.
Wall Installations
Create decorative backsplashes, accent walls, or other focal points with any size Alterna 16″ x 16″, 8″ x 16″, or 12″ x 24.
Fire Test Data
ASTM E 84 – All residential uses & Class C commercial uses (75-200 flame spread)
Numerical flammability ratings alone may not define the performance of the product under actual fire conditions. These ratings are provided only for use in the selection of products to meet the specified limits.
Substrates
Can be installed over the following. All substrates should be sound, clean, dry and smooth.
- Concrete
- Wood
- Dry wall (painted or un-painted)
- Ceramic
- Formica
Do not install over:
- Debris
- Grease
- Loose paint
- Cracked or broken ceramic
- Loose Formica
Installation Procedure
- Spread the adhesive with the recommended trowel and allow the adhesive enough time to become dry and tacky with no transfer to your finger.
- All substrates must be flat. Variations in flatness must not exceed 1/16″ (1.6 mm) in 1′ (30.5 cm).
- After installation is complete, roll the entire wall area in both directions with a hand roller or rolling pin. The tiles must be thoroughly rolled before grouting.
- Do not pinch the tiles, leave a small gap at any adjoining surfaces.
- Allow 10% cutting allowance for most installations.
Grouting
- Use S-693 Premixed Sanded Acrylic Grout, and space 1/16″ (1.6 mm),1/8″ (3.2 mm), 3/16″ (4.8 mm) or 1/4″ (6.4 mm) apart. The tighter the spacing, the less visible the grout lines will be.
- Grout is ready to use, requires no sealing and resists stains and cracking.
- Use hard epoxy float and keep grout isolated to the joint area.
- Work small areas and do not let grout dry on surface. Light water mist ok prior to cleanup step.
- Square cellulose sponges work best and are better than ceramic grout sponges. White pad can be used if needed.
- Do not over-work joints or use too much water.
- Any light haze that remains can be removed after grout hardens (at least 24 hours) using white pad and water. If necessary, properly diluted Armstrong Flooring Once ’n Done floor cleaner can be used. Rinse thoroughly.
Precautions
- Do not wash or scrub the new Alterna flooring for at least 5 days after the installation. This will prevent excess moisture and cleaning agents from interfering with the adhesive bond and hardening of the grout.
- Do not use Armstrong Flooring New Beginning Extra-Strength Floor Stripper or other floor strippers for cleaning the grout or maintaining the Alterna installation as they are too harsh and will degrade grout.
Repairs
For tile replacement procedures, see Armstrong Flooring Grouted Engineered Tile Replacement